Tools for Speaker Builders
Tools for Speaker Builders
As with starting any new hobby, a person gets excited. They want to throw themselves into it whole-heartedly. And just like a new relationship, a person just throws themselves into it, especially in the honeymoon period.
Now, if you are like me, you already were interested in some area related to audio, but you do not yet understand the scope of what all goes into audio transmission and how amazing it truly is that we can even do the cheaper implementations embedded into devices and they just work. This isn’t to suggest the cheaper implementations are good. But the more you learn, it is a marvel to see them everywhere. There are many aspects to audio, from the electronics to drive a clean signal to digital signal processing to correction for certain aberrations in the signal chain or aspects of speaker design. Then you have the cabinet or enclosure and woodworking.
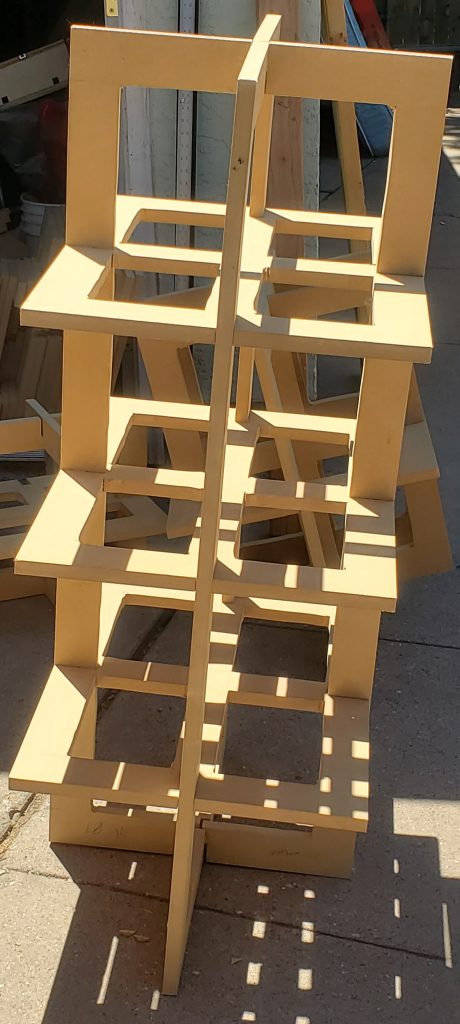
As to enclosures, you will find out quickly what a cabinet resonance is. You’ll learn about bracing, insulation, and possibly constrained layer damping. You might even come up with some crazy bracing design of interlocking pieces that also interlock with shelves or dadoes. This is where the mantra comes in: Keep it Simple Stupid!
Many of those advanced woodworking techniques sound and work great. And if you have the skills or a CNC router (like used in the MK Boom build) for sheet goods, this isn’t a message to you. This is to remind people that if you don’t want a project to drag on forever (and designing and building, even without the advanced woodworking will already take a bit more time than you expect), keep it simple!
Tools to Start With
For example, if you are starting from nowhere, you are likely going to get a job-site or contractor saw (or if where you can, a hybrid/full table saw, but talking about starting a hobby within a hobby—woodworking). You will also have to buy a router, possibly a table router, the bits, a circle jig, and learn the skills. The most basic cabinet is a box. Just cut the sides, line them up, glue together. Next is adding a brace, like a window brace, with the walls glued together. Then there is rabbeting the edges to create a tighter fit for the walls. Further, you have dadoes/shelf slots cut into the sides for bracing. Beyond that, you have interlocking bracing that have to align with the other bracing and the dadoes/shelf slots in the internal sides of the speaker.
Each time you make the design more complicated, you add to your tooling costs (meaning getting the tools, creating the jigs, and research on how to create and how to use the tools and jigs) and training costs so you don’t mess it up (especially with the price of wood, even if we may have a slight reprieve on pricing that I hope remains lower; but sheet goods get price cuts after lumber prices, so we have some ways to go).
Advanced Tools
For example, to add dadoes or shelves, you will either need the bit for the router along with clamps or something to hold a straight edge to get a straight cut, a table router, or a dado stack for the table saw (and a table saw able to actually use dado stacks, which excludes job-site saws for the most part). This automatically raises cost and complexity. Further, if using the router and a straight edge, if you get one side or the other clamped at the wrong place, you may not have a straight cut across the plane, meaning your shelves (the bracing) may not be properly aligned when you go to glue up (an accurate square can help with this, so long as your cuts are square and parallel to start with).
These are not hard things to overcome so long as you are measuring seven times and cutting once. But even then, for a beginning woodworker (or even experienced) you will inevitably make a mistake. The simpler the design and fewer tools needed for creating the enclosure, the less chance for a mistake to be made.
Additional Tools
As another example of something a beginner may consider adding, look no further than rabbeting the edges of the sides of the enclosure. Rabbets are easily added by setting up the height in a table router lift or in your edge or other router to run the edges. You can then run every edge at the same time to make sure the heights will match each other as you did it without stop. This is a simple element to add to the enclosure that increases the surface area for glue bonding by 50%, can help potentially reduce air gaps where the box walls meet, and thereby is a practical addition with little extra skill or difficulty being added to the process.
So being judicious in what to add when you are starting is important. Adding little things like rabbets require little extra effort, but carries a great benefit. Dadoes and shelves are nice thoughts, but take a lot more to do properly, regardless of method. Interlocking brace elements that are set back into dadoes throughout the internal system, leave this for advanced woodworkers. If it interests you, build up to it. You will get there, but don’t jump to the end.
Remember, as with all things in life, this is a marathon, not a sprint. Pace yourself and you’ll get there.