Fewest Tools Needed for Building Speakers (Or How I Learned To Stop Worrying and Love My Router)!
You may wonder what tools are needed to get started building your own custom loudspeakers. The list is surprisingly small if a person is simply trying to build a basic box with bracing. What tools do you need? A plunge router with bits, a circle jig, and clamps. Is that really it? Yes, surprisingly. But don’t you need your sheet goods broken down? Yes. You can often be deal with that if you are willing to pay. We’ll discuss the alternative to paying, which includes a router and a straight edge, you’ll just have a bit more kerf. All in due time.
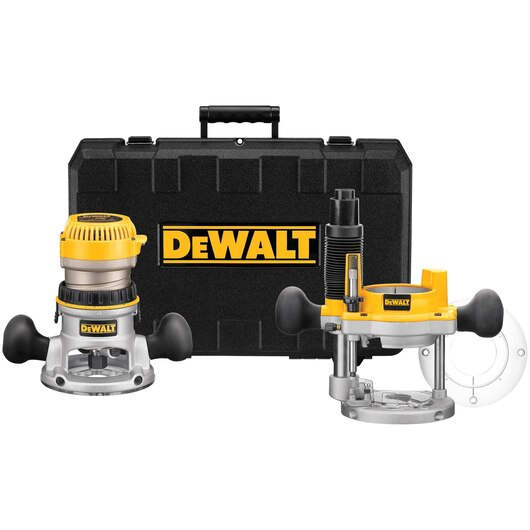
The Plunge Router
This is one of the most versatile tools of woodworking. You can use a router to cut holes, to flush trim the edges, to rabbet the wood, to cut dadoes and grooves, to create interlocking edges, and even to surface a face of a project (not needed for speaker cabinets, but still cool).
Uses of the Router
A router is one of the easiest ways to cut circles into a baffle. This includes recessing the frame of the driver to sit flat with the surface of the baffle. The primary ways in which a beginner cabinet maker will use this tool is basic rabbeting, plunge routing, flush trimming, and round-overs or chamfers.
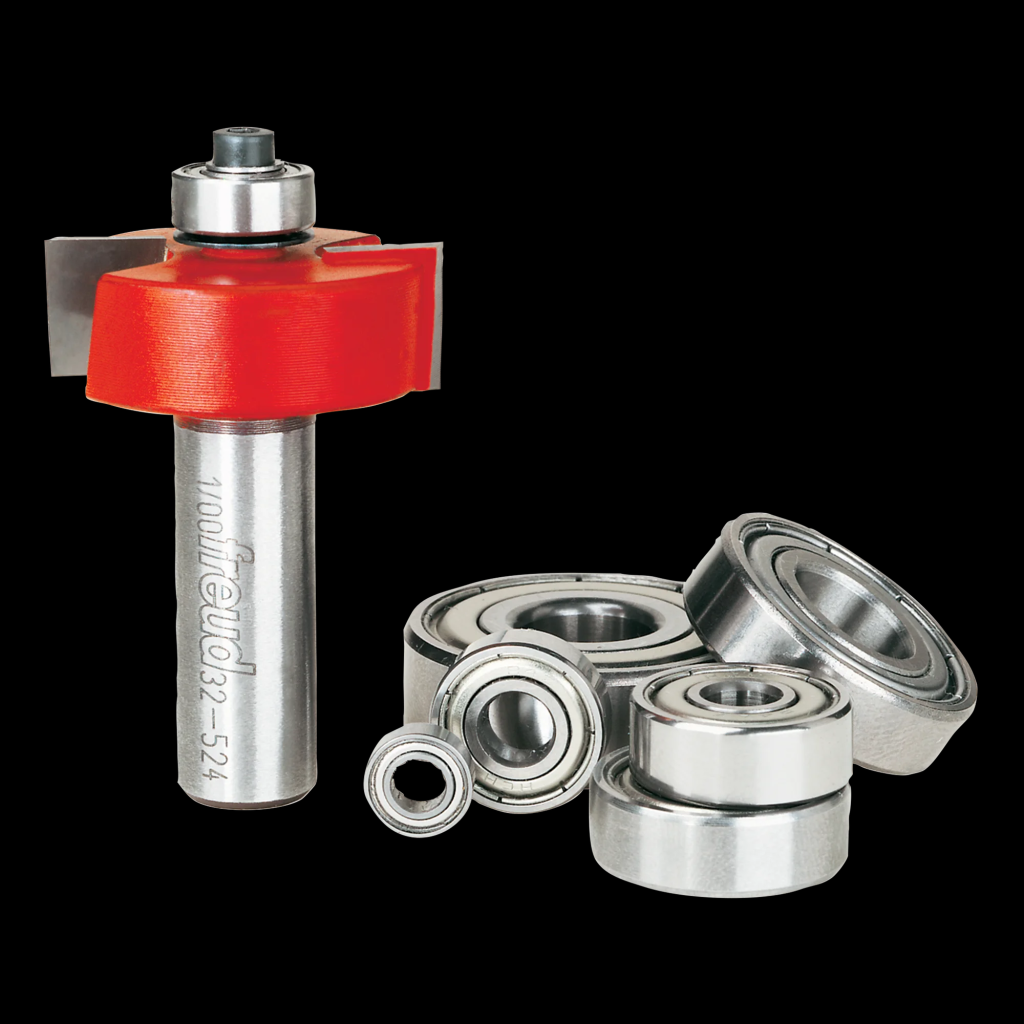
Rabbeting Bits
When will you need to do each of the above? For rabbeting, you use this if you want the edges of the enclosure to have a stepped edge to increase glue surface contact area. The other way you could use rabbeting is to create the recess for drivers or to fix if you did not reach the right depth when doing this the other way discussed below.
Plunge Routing
As to plunge routing, you will use this when cutting out the driver holes in the baffle. It can also be used when cutting out the area for a terminal cup. Or you can also use this to cut out the holes in bracing or to create dadoes and grooves. Then you can either take a straight edge of a piece of wood, clamped down or with double sided tape, but I prefer clamps, or a straight edge clamp or a track for a track saw if you have a track guide for your router model, and you can run it at the specific depth you need to get a clean dado or groove.
Flush Trimming Bits
For flush trimming, you will be using the bit to fix any protrusions where the walls of the cabinet meet so that you get a seamless surface for each side. Simply put in the flush trim bit and run it over the edges that are protruding with the bearing riding along the lower surface. This knocks it back down level with the side while saving a little time and effort on sanding.
Pro tip: if you did not get a great seal when gluing or you see a partial gap, take some of the sawdust from all the routing, mix it with some wood glue, then apply this to the area. You can do this with a putty knife, if one is available. But if in a pinch, you could even force it into the crack with some cardboard or a political mailer, after all, those are trash and just going to be thrown away anyways. You might as well get more use out of it than the politician did.
Round-overs and Chamfer Bits
Finally, you have round-overs and chamfers. This is primarily for the fit and finish of the final product. It’s often nice to use the router to take the sharp edge off the wood, especially if you have small children prone to falling over at home. Not only this, but chamfers often have some of the best effects on diffraction. That is unless doing large round-over radii or building a round speaker like a globe. But considering this is written for those just starting, it is foolish to talk about a globe style speaker.
Recommendation
For my recommendation on the type of router to get, if you can only get one (two is always better), is to get a nice 2.25 HP plunge router. A trim router would be the next one I would recommend. Lastly would be a beastly 3.25 HP router for use in a router table. But, when just getting started, the 2.25 HP is the right blend of versatility and size, with the ability to handle both quarter and half inch shanks for your bits. Now, if you can buy a second one, a trim router will make the round-overs and chamfers much easier. They are small, comparatively, and able to quickly and easily control when running around to take off the sharp edges.
The Router Bits
We covered a plethora of tasks that can be done with a router. But you still have to have the right bits for the job. Now, bits are consumable. If you are unsure what bits you need, I’d recommend getting a C3 carbide general set with half inch shanks from Yonico or Kowood. These bits are great for the price and these brands use C3 carbide rather than a different level of carbide. C2 is a bit soft, whereas C4 is harder, but can crack and shatter easier on nails and similar objects. On the other hand, if you have the money and know you will be using that bit a fair amount, it might be worth the money to splurge on the higher end bit.
It is important to remember that bits will wear down, chip, and possibly even break over time. Do not wait to replace your bits until this happens. A bit breaking while spinning at thousands of rotations per minute in a router is extremely dangerous. If you see the bit is chipped and possibly cracked, please, for your own safety, replace it. As such, don’t think these will last forever. But, the more expensive bits will last for a longer period of time. Do a cost benefit analysis on time and usage to decide if you, personally, would benefit from replacing with a cheaper bit or a high-end bit.
Get the Rabbet
With that said, you will likely want to get a rabbeting bit set. These come with swap-able bearings. I prefer buying a more expensive bit set with a coating to help the bit last longer. These sets usually also have extra bearings that give more options on rabbeting depths as well. I have enjoyed my Freud set. But there are many fine brands, from Whiteside with Astra Coating sold by Bits & Bits to CMT. For this, I do recommend spending the bit extra for a good set, that way it will last you longer.
Upper Cut with a Twist
Sometimes, circle jigs require a specific size bit, such as the Jasper Jig, discussed below. When that is the case, I prefer to buy a dedicated bit that I store with the Jig. In my case, I purchased a Whiteside RU4700 standard spiral up cut bit made of solid carbide. Bits & Bits does not carry this SKU with an Astra coated finish, but it is found on Amazon, has an half-inch shank, a quarter-inch cutting diameter, and an one-inch cutting length. If taken care of, this bit will be very robust and will last quite some time alongside the jig.
With that said, if trying to buy bits for the router on a limited budget, you might try to find a cheaper set of bits, like mentioned above, that has a quarter inch diameter, half inch shank with it, just to save on initial purchase cost. You can always buy the better bit later after you have consumed the initial one in a kit. But the spiral bit is better than the straight edge bits often found in these kits.
Buy Router Bits In Bulk
The other bits needed, such as round-over, chamfer, flush trim, and dado/straight edge bits can generally be bought in a set like those mentioned above. When you wear them out, you may consider purchasing a higher end replacement. But until then, you are getting started and this is more than satisfactory to get going on building your own cabinets, get used to maintaining the bits, and to get them all in an affordable package with other bits for other projects. Generally, buying a good version of each bit you would use will cost as much or more than buying the kit while also not getting other versions of bits in different sizes that you could find useful in certain cases. As such, I recommend a bit set to start.
Give ‘em the clamps, Clamps!
Clamps are the bane of most woodworkers. Why? Because you can never have enough and there are so many different versions you need to do different tasks. When starting out, I personally recommend getting some cheap versions of the following types of clamps.
Strap/Band Clamps
Strap/band clamps are great for making boxes. These are made so you can vary the strap length, use the 90 degree portions that the band slips through (which can be removed in the event of having large round-overs where the corner cannot sit properly in the 90 degree part) to help grab the edges, then pull tight and twist the handle of the clamp to tighten into place. These are an excellent value for what they do.
Pipe Clamps
These are more expensive, but have a lot of versatility. You can use these with any length of pipe, which helps greatly. But, it also requires you to buy the pipe, which can get very expensive. The pipe multiplies the cost greatly, so although it can be used with many lengths and in many ways, it is not the most economical clamp, necessarily, for starting out woodworking. It is cheaper than cabinet clamps, though, and able to have an internal clamping length longer than many for the price. This is especially true if building tower speakers.
Bar Clamps
These simple clamps are much like the pipe clamps, except you cannot swap out the length of pipes. This means you will need to have many clamps of the same length and the storage space to put them when not in use. If you bought four pipe clamps, you could just swap out the length of pipe. But bar clamps are fixed. The up side is these are finished products and you can grab and go.
They also come in many styles, including having quick release mechanisms, F-style, and parallel (which has parallel surfaces and is excellent for cabinet making, but comes at a much higher cost). For starting, I’d recommend, if on a budget, picking up some F-style bar clamps or some other style of bar clamp and getting more at a later date. After all, you may need to clamp down the pieces to your work surface to route or need longer ones to clamp the box together during a glue up if not using the band clamps (or using both).
Didn’t You Say The Sheet Needs Broken Down?
Of course you have to break down the sheet into the smaller pieces in order to make it usable.
Have Someone Else Do It
What many may not realize is that if you are nice to the people at your big box store or many other stores where you can buy sheet goods, they can usually cut the sheet down a bit for you. Some stores have a policy of one or a few cuts. That would allow you to turn the 8’x4’ into two 4’x4’ to bring home. Beyond those initial free cuts (or cuts you sweet talk your way into for free), many stores will continue cutting to break down the sheet for you for a nominal fee.
Because of this, if you come prepared, you can have them cut the pieces slightly oversized and pay for it there, that way you do not need a table saw or a track or circular saw. After that, if you use a straight edge guide with the plunge router, you can clean it up to the final size with a nice edge.
Plunge (Router) Away
In the alternative, you can take a straight edge bit that can go through the entire thickness of the sheet, layout your cuts, and then use your plunge router to cut down the sheet. Granted, this will lose a fair amount to kerf, the waste due to the thickness of the bit used, but it will give a straight edge so long as the guide edge you use is straight. Just use a combination square to have a proper line to reference that is parallel to the factory edge.
Also, you will have to know the offset from the bit to the clamped straight edge you are using to push your plunge router against while routing. Just use a scrap piece of wood to figure out this offset and things become much simpler. You place a second line that offset distance from your cut, then you clamp the straight edge to that line and guide the router. Very simple.
A Perfect Circle Is Not Just A Band, It’s a Jig
You may wonder how do I get the circles cut into the baffle for my drivers? That is simple enough and there are numerous ways to accomplish this.
DIY Jig
The cheapest is to drill two holes in a piece of wood. One is for the pivot point, which you want to drill it large enough to use a nail or similar in the center of the circle. The other hole must be large enough that the bit can fit through. You measure and set the distance between the two holes to the radius of the circle you are trying to create. Then you attach that piece of wood to your router as a base. The benefit is this is cheap. The drawback is that it fits only that size circle (unless you recreate a Rockler style circle jig).
Store Bought Jig
The next way to accomplish this is to buy a jig. I like the ability to dial in the size seen with Jasper jigs. They lay out the pivot points in a grid style that makes it incredibly easy to make the perfect circle every time. Another is the Rockler style. For this, they have it where you can slide the pivot point closer to get the right radius. This allows for setting the distance between the bit and pivot at more intervals. But it also takes more effort to make sure you have to radius set correctly. Both are great, but I personally went with the polycarbonate Jasper Jig.

Set-back Now or Rabbet Later
As to making the circles, you also have a choice to either make the recess now with the jig for the driver to sit flat or to use the rabbeting bit. You would set the plunge depth to the level to make the driver frame sit flush. But you will have to route out in stages to that depth at various distances from the pivot of the jig to get the lip from the outer edge of the driver to the recommended cutout diameter. If you do not want to reset the radius on the jig and route in circles repeatedly, possibly with the cord wanting to wind up as you make those circles, then you can use a rabbet bit and lock the plunge base to the desired height which should match the thickness of the driver’s frame, then just ride that around the circle cut to the cutout diameter recommended for the driver.
Summary – Routers, Bits, and Jigs, Oh My!
So that is it. It really is that simple. Grab yourself a router and get going. Buy your bits. Get some clamps. And get those creative juices flowing. Don’t be afraid to ask the store clerks to help cut down your wood for you. They’ll be happy-ish to help, especially if charging for the service. It really is that easy.
Many people, including myself before I started, think you need this huge plethora of tools to do the fine woodworking, to get the straight edges, and to accomplish the goal. They just do not understand exactly how versatile a router can be. It can do everything! You just have to be creative, understand which bits you will use in your design, and get to work. I’m sure you will thank yourself when you see what you can create.
Also, I didn’t include measurement devices, but do recommend a good ruler or combination square, if possible. I have a 24” blade for my combination square, which can accomplish most of the measurements needed. You may also need a four foot ruler if building especially large speaker cabinets. But that is a story for another time. If you want to find out more, check out the forums for more tips.